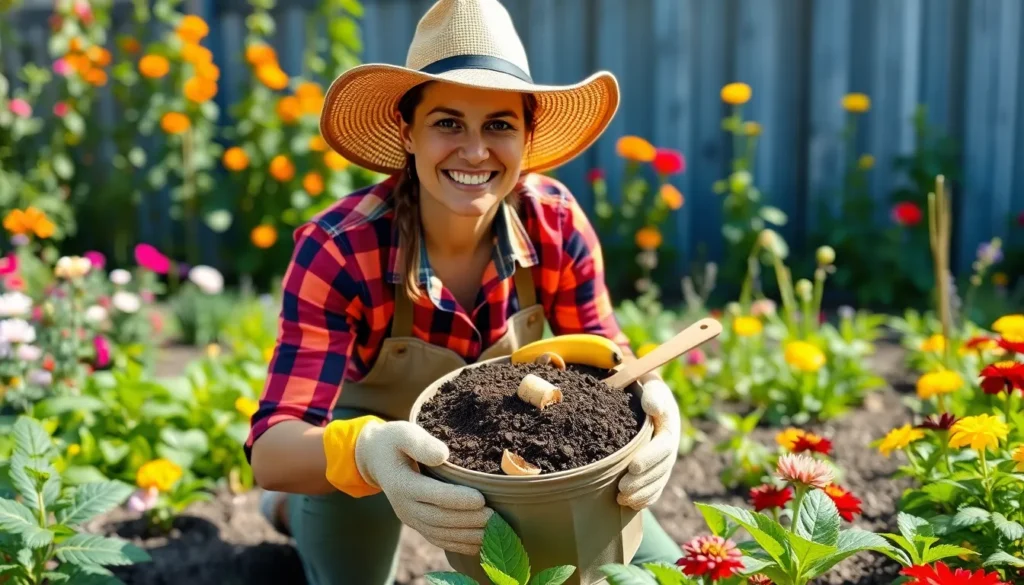
Creating your own plant fertilizer at home isn’t just a money-saving hack – it’s a game-changer for your garden’s health and your wallet. We’ve all been there, staring at expensive commercial fertilizers while wondering if there’s a better way to nourish our green friends.
The truth is, some of the most effective plant nutrients are probably sitting in your kitchen right now. From coffee grounds to banana peels, these everyday items can transform into powerful fertilizers that’ll make your plants thrive like never before. We’re talking about ingredients that cost pennies compared to store-bought alternatives.
Ready to unlock the secrets of DIY plant nutrition? We’ll show you exactly how to create nutrient-rich fertilizers using simple household items that’ll have your plants growing stronger, greener, and more vibrant than ever before.
Understanding the Benefits of DIY Fertilizer for Plants
Creating your own plant fertilizers offers multiple advantages that transform both your gardening experience and plant health. We’ll explore the key benefits that make homemade fertilizers an intelligent choice for any gardener.
Cost-Effective Plant Nutrition Answers
Homemade fertilizers cost significantly less than commercial products while delivering comparable or superior results. We can create effective plant food using kitchen scraps like coffee grounds, which cost nothing beyond what we already spend on daily coffee consumption. Commercial fertilizers often range from $10 to $50 per bag, but our DIY alternatives use materials we’d typically throw away.
Banana peels provide potassium rich nutrition at zero additional cost since we consume the fruit anyway. Eggshells offer calcium supplementation without purchasing expensive bone meal products. Coffee grounds supply nitrogen and improve soil structure while reducing our household waste stream.
Budget conscious gardeners save hundreds of dollars annually by switching to homemade fertilizer recipes. We eliminate recurring purchases of synthetic plant foods and reduce dependency on garden center products. Our kitchen waste becomes valuable plant nutrition instead of landfill material.
Chemical-Free Organic Alternatives
Synthetic fertilizers contain harsh chemicals that can damage soil microorganisms and beneficial insects over time. Our homemade alternatives use natural ingredients that nourish plants without introducing toxic substances into the growing environment. We protect both plant health and environmental balance through organic approaches.
Natural fertilizers improve soil biology by feeding beneficial microorganisms that create healthier root systems. Kitchen scraps break down gradually, providing sustained nutrition rather than quick chemical bursts that can burn plant roots. We create living soil ecosystems instead of sterile growing mediums.
Organic ingredients reduce chemical runoff that contaminates groundwater and nearby water sources. Our DIY fertilizers decompose naturally without leaving harmful residues in the soil. We contribute to environmental sustainability while maintaining beautiful, productive gardens.
Customizable Nutrient Blends for Exact Plants
Different plants require unique nutritional profiles that we can customize through targeted ingredient combinations. Tomatoes benefit from calcium rich eggshell fertilizers to prevent blossom end rot, while leafy greens thrive with nitrogen heavy coffee ground applications. We match fertilizer recipes to exact plant needs rather than using generic commercial blends.
Flowering plants need phosphorus rich mixtures that we create using bone meal alternatives or composted organic matter. Acid loving plants like blueberries respond well to coffee ground applications that lower soil pH naturally. We adjust nutrient ratios based on plant species and growth stages.
Seasonal adjustments optimize plant performance through customized fertilizer scheduling and ingredient modifications. Spring applications focus on nitrogen for leaf development, while fall fertilizers emphasize potassium for root strengthening. We control exactly what nutrients our plants receive throughout their growing cycles.

Creating Compost-Based DIY Fertilizer for Plants

Composting transforms your kitchen scraps and yard debris into nutrient-rich fertilizer that costs virtually nothing to make. We’ll show you how to create this powerful plant food using materials you already have at home.
Kitchen Scraps and Yard Waste Combinations
Successful compost starts with the right balance of green and brown materials working together. Green materials like fruit peels, vegetable scraps, and coffee grounds provide nitrogen that plants need for healthy leaf growth. Brown materials such as dry leaves, grass clippings, twigs, and wood chips supply carbon that creates the proper environment for decomposition.
We recommend using two to three times more brown materials than green materials by volume. This ratio ensures proper decomposition while preventing odors and pest problems that occur when nitrogen-rich materials dominate your pile.
Coffee grounds work exceptionally well in compost because they’re already partially broken down and rich in nitrogen. Banana peels add potassium that helps plants develop strong root systems and resist disease. Eggshells contribute calcium while dry leaves provide the carbon structure that allows air to flow through your pile.
Proper Composting Techniques for Maximum Nutrients
Building your compost pile correctly maximizes nutrient content and speeds up decomposition. Start with a 4 to 6 inch layer of bulky brown materials like twigs and wood chips at the bottom to improve airflow throughout the pile.
Layer your materials like lasagna by alternating greens and browns in thin sections. Keep your pile moist like a wrung out sponge but not soggy since too much water creates anaerobic conditions that slow decomposition. Turn your pile occasionally with a pitchfork or shovel to maintain proper aeration.
Temperature monitoring helps ensure your compost develops properly. Well-maintained piles reach 130° to 160°F which kills harmful pathogens and weed seeds while speeding up the breakdown process.
Trench composting offers an alternative method where you bury kitchen scraps directly in garden beds. Dig holes 8 to 12 inches deep and cover scraps with soil or leaves. This technique feeds soil organisms directly while improving fertility in exact planting areas.
Timeline for Compost Maturity and Application
Finished compost typically develops in several weeks to a few months depending on temperature, moisture levels, and material balance. Your compost is ready when it has a crumbly texture and earthy smell without recognizable food scraps remaining.
Apply mature compost by spreading a 2 to 3 inch layer over garden beds before planting season. Mix it into potting soil for container gardens or use it as top dressing around established plants during growing season.
Compost tea provides faster nutrient delivery when plants need immediate feeding. Steep one part compost in five parts water for 1 to 3 days, then strain the liquid and apply directly to plant roots. This method delivers nutrients quickly while the remaining compost continues improving soil structure over time.
| Application Method | Timing | Amount |
|---|---|---|
| Garden bed amendment | Before planting | 2-3 inch layer |
| Container soil mix | Any time | 25-30% of total volume |
| Top dressing | Growing season | 1-2 inch layer |
| Compost tea | As needed | 1:5 ratio compost to water |


Making Liquid DIY Fertilizer for Plants Using Household Items

Liquid fertilizers deliver nutrients directly to plant roots for faster absorption than solid alternatives. We’ll show you how to transform common kitchen scraps into powerful plant food that rivals commercial products.
Banana Peel Tea Recipe and Benefits
Banana peel tea provides potassium, phosphorus, and calcium that strengthen plants and improve fruit quality. We soak 4-5 banana peels in a gallon of water for 24-48 hours to extract these essential nutrients into liquid form.
Potassium from banana peels enhances root development and helps plants resist disease. Phosphorus supports flowering and fruit production while calcium strengthens cell walls throughout the plant structure.
Outdoor plants, vegetables, and fruiting trees benefit most from banana peel tea applications. We avoid using this liquid fertilizer on indoor houseplants because the sugar content attracts unwanted insects and can promote fungal growth.
Application involves straining the liquid and diluting it with equal parts water before watering plants at the base. We apply banana peel tea every 2-3 weeks during the growing season for optimal results.
Coffee Grounds Liquid Fertilizer Method
Coffee grounds liquid fertilizer delivers nitrogen that promotes lush, green foliage growth. We steep 2 cups of used coffee grounds in 1 gallon of water for 24 hours to create this nutrient rich solution.
Nitrogen from coffee grounds supports chlorophyll production and vigorous leaf development. This liquid fertilizer also adds organic matter that improves soil structure and encourages beneficial microbial activity.
Straining removes solid particles while leaving dissolved nutrients in the water for easy plant uptake. We dilute the coffee ground tea with an equal amount of water to prevent over fertilization that can burn sensitive roots.
Weekly applications during spring and summer provide consistent nitrogen without overwhelming plants. Leafy greens, herbs, and foliage plants respond particularly well to regular coffee ground liquid fertilizer treatments.
Eggshell and Vinegar Calcium Solution
Eggshell and vinegar solution creates a calcium rich fertilizer that prevents common plant disorders. We crush 6-8 clean eggshells and soak them in 1 cup of white vinegar for 24 hours to break down the calcium carbonate.
Vinegar’s acidity dissolves eggshell calcium into a form plants can readily absorb through their root systems. This calcium solution prevents blossom end rot in tomatoes, peppers, and squash while strengthening overall plant structure.
Dilution with 10 parts water creates a gentle calcium supplement that won’t shock plant roots. We apply this solution every 2 weeks to calcium hungry crops like tomatoes, broccoli, and leafy greens.
Storage in a sealed container keeps the calcium solution fresh for up to one month in cool conditions. Signs of calcium deficiency include stunted growth, yellowing leaves, and fruit disorders that this homemade solution effectively addresses.


Preparing Dry DIY Fertilizer for Plants with Natural Ingredients

Creating dry fertilizer blends lets us store nutrients for future use while providing plants with slow-release feeding. These natural combinations work especially well for gardeners who prefer applying fertilizer less frequently.
Wood Ash and Bone Meal Combinations
Wood ash and bone meal create one of the most effective balanced fertilizer mixes we can make at home. Following Mel Bartholomew’s proven recipe, we combine 1 part blood meal, 2 parts bone meal, 3 parts wood ash, and 4 parts compost or leaf mold to achieve a nutrient ratio of approximately 2.6-4.9-2.4, which matches commercial 5-10-5 fertilizers.
Blood meal provides essential nitrogen that leafy crops like lettuce and cabbage need for robust growth. Bone meal delivers phosphorus and calcium, supporting strong root development and flower production. Wood ash contributes potassium while raising soil pH, making it particularly beneficial for acidic soils.
We can also layer these ingredients in a compost pit with manure for slow decomposition over several months. This method creates an even richer fertilizer blend that gradually releases nutrients throughout the growing season.
Crushed Eggshells for Calcium Supplementation
Crushed eggshells serve as an excellent slow-release calcium carbonate source that prevents common plant deficiencies. Tomatoes and peppers especially benefit from this natural calcium boost, which strengthens cell walls and reduces blossom end rot.
Drying eggshells completely before crushing them into fine powder ensures faster soil integration. We can mix this powder directly into potting soil or sprinkle it around established plants in garden beds. The calcium gradually becomes available as the shells break down naturally in soil.
Plants absorb this calcium over time, improving their structural integrity and disease resistance. Regular applications help maintain consistent calcium levels in soil, preventing the yellowing and stunted growth associated with calcium deficiency.
Dried Seaweed and Fish Emulsion Blends
Dried seaweed combined with fish emulsion creates a nutrient-dense fertilizer that provides both macro and micronutrients. Seaweed contains potassium, growth hormones, and trace minerals that enhance plant vigor and stress resistance.
Fish emulsion adds nitrogen and additional minerals from fish byproducts, promoting lush leafy growth while seaweed stimulates root development. This combination enhances soil microbial activity, creating a healthier growing environment for plants.
We can mix dried seaweed powder with liquid fish emulsion to create a paste-like consistency for direct soil application. Alternatively, we can apply them separately, using seaweed as a soil amendment and fish emulsion as a liquid feed during the growing season.


Formulating Nutrient-Specific DIY Fertilizer for Plants

Creating targeted fertilizers for exact plant needs maximizes growth potential and prevents nutrient deficiencies. We’ll explore three essential nutrient-focused formulations that address distinct plant requirements.
High-Nitrogen Mixtures for Leafy Greens
Blood meal delivers exceptional nitrogen content with its impressive 12-0-0 NPK ratio, making it perfect for heavy feeders like spinach, kale, and salad greens. Organic gardeners appreciate this natural source because it promotes lush, rapid vegetative growth and vibrant foliage without synthetic chemicals.
Urea provides the highest nitrogen concentration at 46-0-0, offering quick nutrient availability when plants need immediate feeding. Commercial growers often choose this synthetic option for its efficiency, though we recommend careful application to prevent burning.
Soybean meal offers sustainable slow release nutrition with its balanced 7-1-2 NPK ratio, maintaining steady nitrogen supply without over-fertilization risks. Gardeners prefer this option for consistent feeding throughout the growing season.
Application rates should target approximately 0.5 pounds of nitrogen per 1,000 square feet before planting for optimal results. Mix these ingredients with compost or aged manure to create complete fertilizer blends.
Phosphorus-Rich Answers for Flowering Plants
Bone meal supplies phosphorus gradually through its slow-release properties, supporting strong root development and abundant flower production. Flowering annuals like marigolds, petunias, and zinnias thrive with this organic amendment incorporated into their planting beds.
Rock phosphate provides long-term phosphorus availability for perennial flowering plants that need sustained nutrient support. Roses, peonies, and flowering shrubs benefit from this mineral-based source applied in fall or early spring.
Combining bone meal with compost creates balanced flowering fertilizer that supports both immediate and long-term plant needs. Mix 2 cups bone meal per cubic yard of compost for container plantings or garden bed preparation.
Testing soil phosphorus levels prevents over-application since excess phosphorus can block other nutrient uptake. Apply phosphorus-rich fertilizers based on soil test results rather than general recommendations.
Potassium-Heavy Blends for Fruit Development
Kelp meal delivers concentrated potassium along with trace minerals that enhance fruit size, quality, and overall plant health. Tomatoes, peppers, and fruit trees show improved yields when fed kelp-based fertilizers during fruit development stages.
Wood ash provides readily available potassium from hardwood sources, though we must test soil pH before application since ash raises alkalinity. Fruit-bearing plants like blueberries and citrus trees benefit from ash applications when soil tests indicate need.
Sulfate of potash offers pure potassium nutrition without excessive nitrogen or phosphorus that could interfere with fruit production. Berry bushes, grape vines, and stone fruit trees respond well to this targeted potassium source during their fruiting season.
| Fertilizer Type | Primary Nutrient | Best Sources | Application Rate |
|---|---|---|---|
| High-Nitrogen (Leafy Greens) | Nitrogen (N) | Blood meal (12-0-0), Urea (46-0-0), Soybean meal (7-1-2) | 0.5 lb N per 1,000 sq ft |
| Phosphorus-Rich (Flowers) | Phosphorus (P) | Bone meal, Rock phosphate | Based on soil test needs |
| Potassium-Heavy (Fruits) | Potassium (K) | Kelp meal, Wood ash, Sulfate of potash | Balanced application during fruiting |
Timing applications with plant growth stages maximizes nutrient efficiency and prevents waste. Apply nitrogen-heavy fertilizers during active vegetative growth, phosphorus-rich blends before flowering, and potassium-heavy mixtures during fruit development for best results.


Understanding Application Methods for DIY Fertilizer for Plants

Knowing how to properly apply our homemade fertilizers maximizes their effectiveness and ensures our plants receive nutrients when they need them most. Different application methods work better for exact growth stages and plant types.
Soil Amendment Techniques and Timing
Broadcasting our DIY fertilizer before planting gives us the most reliable results for nutrient distribution. We spread the fertilizer evenly over our garden soil and mix it into the top 3 to 4 inches before adding seeds or transplants. This method is the least likely to damage plants since nutrients are already incorporated into the soil.
Band application works well when we want to concentrate nutrients near plant rows. We apply fertilizer in strips beside our planted rows, taking care to avoid direct contact with roots that could harm or kill our plants. This technique localizes nutrients exactly where developing root systems can access them.
Starter answers provide immediate nutrition for transplants like tomatoes and peppers. We create a diluted fertilizer mixture using 2 tablespoons of our garden fertilizer per gallon of water and pour it directly into transplant holes before planting. Young plants get an instant nutrient boost that helps them establish stronger root systems.
Side dressing supports our growing plants throughout the season by applying fertilizer alongside established rows. We sprinkle about half a cup of fertilizer per 10 feet of row and water it in thoroughly. This method proves especially beneficial in sandy soils or after heavy rains wash away existing nutrients.
Foliar Feeding Best Practices
Foliar feeding delivers nutrients directly through plant leaves for rapid absorption when our plants need quick nutrition. We prepare diluted fertilizer teas from our homemade compost by soaking organic materials in water for 2 to 24 hours. Proper dilution prevents leaf burn that can damage plant tissues.
Timing our foliar applications during cooler parts of the day reduces stress on plants and improves nutrient uptake. Early morning or late afternoon sessions work best since midday heat can cause rapid evaporation and potential leaf damage. We spray our liquid fertilizers onto both upper and lower leaf surfaces for maximum absorption.
Testing our foliar answers on a small area first helps us determine the right concentration for different plant types. Acid loving plants like tomatoes and blueberries respond well to coffee ground teas, while calcium hungry crops benefit from eggshell and vinegar answers. We adjust our recipes based on exact plant requirements and growth stages.
Seasonal Application Schedules
Early spring preparation sets the foundation for healthy plant growth throughout the growing season. We broadcast compost or organic fertilizer before planting and incorporate it thoroughly into garden beds. This timing allows nutrients to become available as soil temperatures warm and root activity increases.
Planting time applications provide immediate support for new transplants and seeds. We use band applications or starter answers during this phase to give plants the nutrients they need for strong establishment. Coffee grounds work particularly well for acid loving plants during initial planting.
Growing season maintenance keeps our plants well fed during peak growth periods. We side dress established plants when they start flowering or fruiting, since nutrient demand increases significantly during these stages. About every 4 to 6 weeks of side dressing maintains consistent nutrition levels.
Fall applications improve soil structure and prepare garden beds for winter. We add organic matter like compost and chopped leaves that decompose slowly through colder months. This timing allows nutrients to become available just as spring growth begins, creating a continuous feeding cycle for our plants.


Storing and Preserving Your DIY Fertilizer for Plants

After creating your nutrient-rich homemade fertilizers, proper storage becomes essential for maintaining their effectiveness. We’ll explore the key practices that ensure your DIY fertilizers remain potent and safe to use.
Proper Container Selection and Labeling
Sealed airtight containers prevent moisture ingress that can degrade your fertilizer components. We recommend using sturdy, opaque containers that protect against light exposure which can break down nutrients over time.
Label each container clearly with the fertilizer type, preparation date, and ingredients list. This prevents confusion when you have multiple fertilizer types stored and ensures safe handling months later.
Plastic containers with tight-fitting lids work well for granular fertilizers, while glass jars excel for liquid preparations. Metal containers should be avoided as they can react with acidic ingredients in your homemade fertilizers.
Shelf Life and Storage Conditions
Granular fertilizers remain effective for 2-3 years when stored properly in dry conditions. Soluble fertilizers last around 2-3 years if kept completely dry and cool.
Liquid fertilizers can last 5-10 years when sealed and stored correctly, making them excellent long-term investments for your garden.
Ideal storage temperatures range between 15-25°C (59-77°F) for maximum nutrient retention. High temperatures accelerate chemical breakdown while freezing can damage liquid fertilizers.
| Fertilizer Type | Storage Life | Optimal Conditions |
|---|---|---|
| Granular | 2-3 years | Dry, cool environment |
| Soluble | 2-3 years | Sealed, moisture-free |
| Liquid | 5-10 years | Airtight containers |
Dry, cool environments preserve nutrient quality longer than humid or warm spaces. Avoid direct sunlight exposure and ensure good ventilation to prevent moisture buildup.
Storage off the ground on pallets or shelves prevents floor moisture from seeping into containers. Basements and garages often provide ideal conditions if properly ventilated.
Safety Precautions and Handling Tips
Store fertilizers separately from other garden chemicals to prevent contamination or dangerous reactions. We recommend dedicating exact storage areas exclusively for fertilizer products.
Wear gloves and masks when handling stored fertilizers to prevent skin contact or inhalation of dust particles. This protection becomes especially important with aged fertilizers that may have concentrated over time.
Keep fertilizers away from children and pets by using locked cabinets or high shelves. Even organic ingredients can be harmful if ingested in large quantities.
Inspect stored fertilizers regularly for clumping, moisture, or unusual odors that indicate spoilage. Clumped granular fertilizers often signal moisture damage while foul smells in liquid fertilizers suggest bacterial growth.
Discard compromised fertilizers carefully if they show signs of separation, mold, or unusual colors. Applying spoiled fertilizers can harm plants and introduce pathogens to your garden soil.
Troubleshooting Common Issues with DIY Fertilizer for Plants

Even with the best homemade fertilizer recipes, we might encounter challenges that affect our plants’ health and growth. Understanding how to identify and resolve these common issues ensures our DIY plant nutrition efforts deliver optimal results.
Avoiding Over-Fertilization Problems
Over-fertilization represents one of the most serious threats to plant health when using any fertilizer type. Excess synthetic nitrogen from store-bought fertilizers can damage plants, acidify soil, weaken roots, and pollute water sources according to research data. Our homemade fertilizers offer a important advantage here since organic nutrients release slowly, naturally reducing over-fertilization risks.
Signs of over-fertilization include:
- Excessive leaf growth with poor flowering
- Salt buildup on soil surface appearing as white crust
- Brown or burned leaf tips and edges
- Stunted root development even though lush foliage
We should apply DIY fertilizers in moderate amounts, starting with smaller doses than recommended and gradually increasing based on plant response. Most homemade liquid fertilizers work best when diluted to half strength initially. Organic compost and dry amendments can be applied every 4-6 weeks rather than weekly to prevent nutrient overload.
Identifying Nutrient Deficiency Signs
Poor growth, discoloration, or leaf deformities often indicate plants aren’t receiving adequate nutrition from our homemade fertilizers. Recognizing exact deficiency symptoms helps us adjust our DIY fertilizer recipes accordingly.
Nitrogen deficiency symptoms:
- Yellowing leaves starting from bottom of plant
- Slow overall growth and pale green coloration
- Early leaf drop and reduced plant vigor
Phosphorus deficiency indicators:
- Poor root and flower development
- Purple or reddish leaf discoloration
- Delayed maturity and reduced fruit production
Potassium deficiency signs:
- Brown leaf edges and scorched appearance
- Weak stems that break easily
- Poor disease resistance and fruit quality
We can address these deficiencies by increasing exact ingredients in our DIY fertilizers. Banana peel powder provides potassium, phosphorus, and calcium for stronger plants. Coffee grounds deliver nitrogen for lush foliage growth. Bone meal supplies phosphorus for better flowering and root development.
Adjusting pH Levels Naturally
Soil pH directly affects nutrient availability, making natural pH adjustment crucial for DIY fertilizer effectiveness. Some homemade fertilizers like coffee grounds are acidic, making them perfect for acid-loving plants such as blueberries and azaleas.
Lowering soil pH naturally:
- Coffee grounds work gradually to increase acidity
- Pine needles and oak leaves create acidic mulch
- Sulfur additions through organic matter decomposition
Raising soil pH naturally:
- Baking soda helps raise soil pH when mixed into fertilizer answers
- Wood ash from hardwood fires provides alkaline minerals
- Crushed eggshells slowly release calcium while reducing acidity
We should monitor plant response and conduct simple soil tests to guide our pH adjustments. Most vegetables prefer slightly acidic to neutral soil (pH 6.0-7.0), while acid-loving plants thrive in pH 4.5-6.0 ranges. Testing soil every few months helps us fine-tune our homemade fertilizer formulations for optimal nutrient uptake.

Conclusion
We’ve shown you that creating effective plant fertilizers doesn’t require expensive store-bought products or complex chemistry knowledge. With simple kitchen scraps and basic ingredients you already have at home you can nourish your plants while saving money and protecting the environment.
The beauty of DIY fertilizers lies in their versatility and customization options. Whether you need quick liquid answers or slow-release dry mixes you now have the tools to create exactly what your garden needs. Remember to start with smaller amounts test your soil regularly and adjust your recipes based on your plants’ responses.
Your journey toward sustainable gardening starts with these simple homemade fertilizer techniques. By implementing proper storage methods following safety guidelines and troubleshooting any issues that arise you’ll develop the confidence to maintain a thriving chemical-free garden year-round.
Frequently Asked Questions
What are the main benefits of using homemade plant fertilizers?
Homemade fertilizers offer significant cost savings compared to commercial products that range from $10-$50 per bag. They’re environmentally friendly, chemical-free, and promote healthy soil biology while reducing harmful runoff. You can customize nutrient blends for specific plants and make seasonal adjustments. Plus, they transform kitchen scraps into valuable plant food at virtually no extra cost.
What common kitchen items can I use to make plant fertilizer?
Coffee grounds provide nitrogen for lush foliage growth, while banana peels offer potassium, phosphorus, and calcium for stronger plants. Eggshells supply slow-release calcium to prevent plant disorders. Other useful items include vegetable scraps for composting, fruit peels for nutrients, and even dried seaweed when available for enhanced plant vigor.
How do I make banana peel tea fertilizer?
Chop 2-3 banana peels and soak them in a quart of water for 24-48 hours. Strain the liquid and dilute it 1:1 with water before applying to plants. This potassium-rich fertilizer strengthens plant structure, improves disease resistance, and enhances flowering. Apply every 2-3 weeks during growing season for best results.
What’s the difference between liquid and dry DIY fertilizers?
Liquid fertilizers provide quick nutrient delivery and are easily absorbed by plants, making them ideal for immediate feeding needs. Dry fertilizers offer slow-release feeding over time and are easier to store long-term. Liquids work best for quick fixes and foliar feeding, while dry fertilizers provide sustained nutrition throughout the growing season.
How do I create a balanced compost-based fertilizer?
Balance green materials (fruit peels, vegetable scraps) with brown materials (dry leaves, twigs) in a 3:1 ratio. Layer materials, maintain moisture like a wrung-out sponge, and turn regularly. Proper composting takes 3-6 months. The finished compost should be dark, crumbly, and earthy-smelling, ready to use as soil amendment or top dressing.
What are the signs of over-fertilization in plants?
Over-fertilization symptoms include excessive leaf growth with weak stems, reduced flowering or fruiting, salt buildup on soil surface, and leaf burn or yellowing. Plants may also become more susceptible to pests and diseases. To prevent this, apply fertilizers in moderation, follow dilution guidelines, and monitor plants regularly for adverse reactions.
How should I store homemade fertilizers properly?
Store liquid fertilizers in clean, labeled containers in cool, dark places for up to 2 weeks. Dry fertilizers should be kept in airtight containers away from moisture and direct sunlight, lasting several months. Always label with contents and date. Inspect regularly for signs of spoilage like mold, unusual odors, or separation.
When is the best time to apply homemade fertilizers?
Apply fertilizers during active growing seasons – spring through early fall. Morning application is ideal for foliar feeding to prevent leaf burn. For soil application, water thoroughly after applying. Avoid fertilizing during extreme heat, drought, or when plants are stressed. Reduce frequency in winter when plant growth naturally slows down.