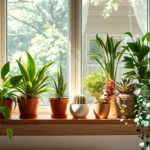
We’ve all struggled with creating stunning garden displays that look professionally designed yet remain manageable for busy homeowners. Rock flower beds with potted plants offer the perfect solution – combining the natural beauty of stone landscaping with the flexibility and convenience of container gardening.
This innovative approach transforms ordinary outdoor spaces into sophisticated focal points that require minimal maintenance while delivering maximum visual impact. By strategically placing colorful potted plants among carefully arranged rocks we create depth texture and seasonal interest that traditional flower beds simply can’t match.
Whether you’re dealing with challenging soil conditions limited time for garden maintenance or simply want the freedom to rearrange your display throughout the seasons rock flower beds with potted plants provide an elegant solution that works for any skill level and budget.
Choose the Right Rocks for Your Flower Bed Foundation
Selecting appropriate stones forms the backbone of successful rock flower bed designs with potted plants. We need to evaluate multiple factors to ensure our foundation supports both aesthetic goals and practical gardening needs.
Select Natural Stone Types
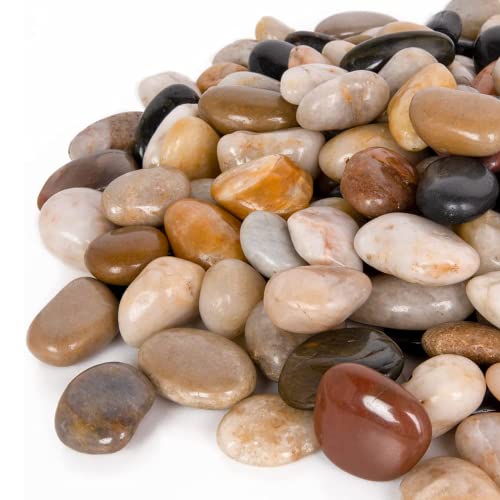
River rocks create smooth, rounded surfaces that complement colorful potted arrangements while providing excellent water flow between containers. These stones typically range from 1 to 6 inches in diameter and offer neutral tones that won’t compete with vibrant flower displays.
Decomposed granite serves as an ideal base material beneath larger rocks, creating stable surfaces for heavy ceramic or concrete planters. This crushed stone compacts well and prevents shifting during watering or seasonal changes.
Lava rock delivers exceptional drainage properties due to its porous structure, making it perfect for areas prone to water retention. The lightweight nature of volcanic stone allows us to move and rearrange potted plant displays without straining our backs.
Flagstone pieces provide flat surfaces where we can position multiple small pots or create staging areas for seasonal plant rotations. These sedimentary stones come in various earth tones that blend seamlessly with natural garden settings.
Consider Rock Size and Color
Large boulders anchor flower bed designs by creating focal points around which we arrange smaller potted specimens. Stones measuring 18 to 36 inches work best for establishing visual hierarchy without overwhelming delicate flowering plants.
Medium rocks measuring 6 to 12 inches fill spaces between larger stones while maintaining proper scale relationships. We position these intermediate sizes to bridge gaps and create natural pathways through potted plant groupings.
Small pebbles ranging from 1 to 3 inches provide textural variety and help retain soil moisture around container bases. These finishing stones prevent water from splashing onto plant foliage during irrigation.
Color coordination enhances the overall aesthetic when we select rocks that complement our chosen pot colors and plant varieties. Warm gray stones pair beautifully with terracotta containers, while cool slate tones complement modern ceramic planters.
Plan for Drainage Properties
Porous stones allow water to percolate through the foundation layer, preventing waterlogged conditions that damage container plant roots. Materials like pumice and expanded shale create air pockets that promote healthy root development.
Gravel layers beneath decorative rocks ensure proper water movement away from potted plant bases. We install 2 to 4 inches of coarse gravel as the bottom foundation layer before adding our chosen decorative stones.
Slope considerations require us to position rocks to direct water flow toward designated drainage areas. Creating gentle gradients of 1 to 2 percent ensures excess water moves away from sensitive plant containers.
Permeable spacing between larger rocks allows air circulation around potted plants while maintaining moisture levels during dry periods. We leave 6 to 12 inch gaps between major stones to accommodate proper plant spacing and future container adjustments.
Design Your Rock Garden Layout

Now that we’ve selected our foundation stones, we’ll focus on creating an intentional layout that maximizes both beauty and functionality. Strategic planning ensures our rock flower beds with potted plants become stunning focal points rather than random arrangements.
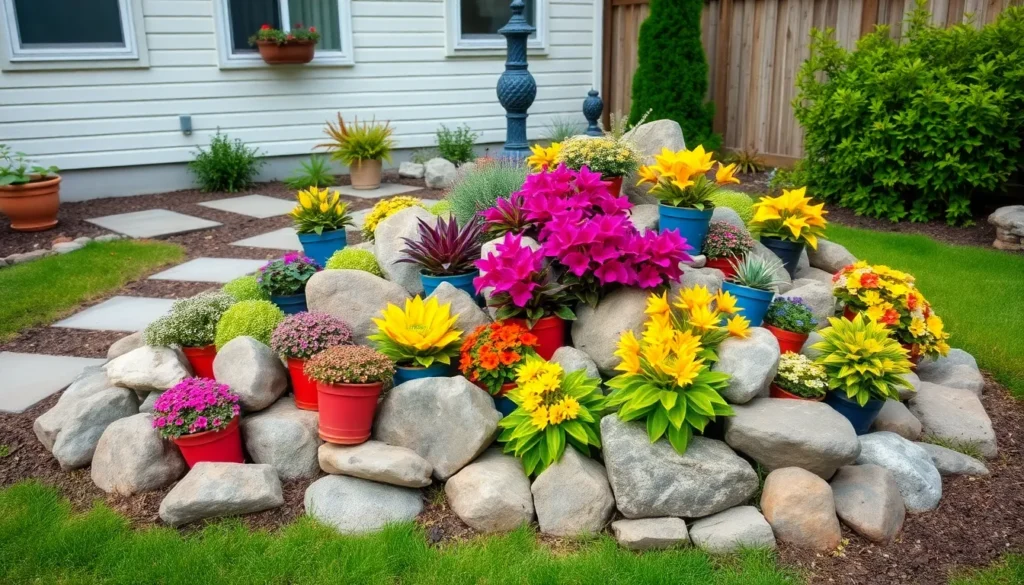
Create Visual Focal Points
Position your largest rocks first to establish anchor points throughout the garden space. We recommend grouping rocks in odd numbers to create naturalistic patterns that feel organic rather than manufactured. Cluster these stones to form natural-looking boulders with crevices where our potted plants can nestle comfortably.
Match plant colors with rock hues to create either striking contrasts or harmonious blends. Red sandstone pairs beautifully with plants featuring reds, silvers, yellows, or whites, while gray stones complement purple and blue flowers. We’ve found that varying plant heights and leaf textures adds crucial dimension that draws the eye naturally through the garden.
Layer different plant sizes around each focal rock to create depth and visual interest. Tall architectural plants like ornamental grasses work as backdrop elements, while medium-height flowering plants fill the middle ground, and trailing varieties soften the rock edges.
Plan Pathways and Access Routes
Design walkways that connect your focal points while providing practical access for maintenance and enjoyment. We suggest framing paths with smaller stones or gravel to maintain the garden’s natural aesthetic while ensuring safe navigation. These routes should flow smoothly between planting zones without feeling forced or artificial.
Create maintenance corridors that allow us to reach every potted plant without stepping on delicate areas. Strategic pathway placement prevents soil compaction and protects both rocks and containers from accidental damage during routine care.
Consider viewing angles when positioning paths to showcase your best plant and rock combinations. We often find that slightly curved pathways reveal different garden perspectives as visitors move through the space.
Establish Planting Zones
Group potted plants with similar care requirements to streamline our maintenance routine and ensure optimal growing conditions. Drought-resistant plants thrive together in sunny, well-drained areas, while shade-loving varieties prefer protected spots behind larger rocks.
Define zones by seasonal interest to maintain year-round appeal in our rock flower beds. Spring bulbs in containers can occupy prominent positions early in the season, then move to background roles as summer bloomers take center stage.
Plan for plant rotation by creating designated areas where we can easily swap containers based on seasonal changes or plant performance. We recommend leaving adequate space between permanent rock features to accommodate different pot sizes and future design adjustments.
Position containers strategically within rock pockets and along pathways to complement planted zones while maintaining design flexibility. This approach allows us to experiment with different arrangements without disturbing the underlying rock structure.
Select Suitable Potted Plants for Rock Gardens

Now that we’ve established our rock foundation and layout, we need to choose plants that’ll thrive in this unique environment. Selecting the right potted plants ensures our rock garden remains vibrant while requiring minimal maintenance.
Choose Drought-Tolerant Varieties
Succulents represent our top choice for rock flower beds because they thrive in rocky, well-drained soil and require minimal water. We recommend varieties like Euphorbia Firesticks, which offer striking fiery red-orange stems that create dramatic color accents against neutral stone backgrounds.
Ice plants deliver low-maintenance beauty with vibrant blooms that grow exceptionally well between stones in rock gardens. These hardy performers cascade naturally over rock edges, softening harsh lines while providing months of colorful flowers.
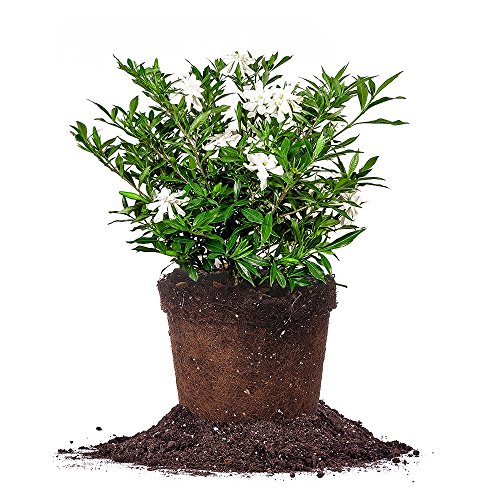
Rock Soapwort (Saponaria ocymoides) excels at filling gaps with cascades of bright pink flowers that spread nicely to cover rocky areas. This resilient perennial adapts to harsh conditions while creating stunning ground cover effects.
We also suggest incorporating small shrubs and perennials like violets, which add texture and year-round color without overwhelming the rock setting. These drought-tolerant options ensure our garden survives in harsh conditions where water retention remains minimal.
Pick Plants with Complementary Heights
Low-growing ground covers like rock soapwort and ice plants work perfectly to soften edges and fill spaces between larger rocks. We position these at the garden’s perimeter to create natural transitions from rock to planted areas.
Medium-height succulents and shrubs add essential vertical interest without overshadowing our carefully selected rocks. Euphorbia Firesticks, reaching about 30 inches tall, serve as perfect focal points amid lower plants while maintaining balanced visual proportions.
Layering different heights creates depth and prevents our rock garden from appearing flat or monotonous. We arrange taller specimens behind shorter ones, ensuring each plant receives adequate sunlight while contributing to the overall composition.
Consider Seasonal Color Schemes
Spring blooms from perennials like violets provide early season interest when many other plants remain dormant. We strategically place these containers where they’ll catch morning light and create welcoming entryways to our rock garden.
Summer color comes from succulents’ vibrant stems and ice plants’ long-lasting blooms that persist through hot, dry months. These reliable performers maintain visual interest when traditional flowering plants might struggle in rocky conditions.
Year-round structure relies on evergreen succulents that maintain their attractive forms and colors during dormant seasons. We use these as backbone plants, ensuring our rock garden never looks bare or neglected regardless of the season.
By combining drought-tolerant succulents, appropriately sized shrubs, and color-coordinated perennials, we create sustainable, eye-catching rock flower beds that enhance our industry’s natural rugged beauty while requiring minimal ongoing care.

Prepare Your Rock Flower Bed Area

Foundation preparation sets the stage for a thriving rock flower bed that showcases your potted plants beautifully. We’ll guide you through essential groundwork steps that ensure proper drainage and structural stability for years to come.
Clear and Level the Ground
Start by selecting your ideal location and removing all grass, weeds, and debris from the designated area. Ground clearing creates a clean slate for your rock flower bed construction while eliminating competition from unwanted vegetation.
Level the soil surface using a rake or shovel to establish an even foundation. Proper leveling ensures water flows correctly throughout your bed and prevents pooling that could damage potted plants.
Remove any large roots or buried obstacles that might interfere with rock placement. These hidden barriers can create unstable spots where your carefully arranged stones might shift over time.
Install Proper Drainage Systems
Create a drainage layer using coarse sand or gravel as your base foundation. Rock gardens and container plants thrive with excellent water flow that prevents root rot and soil saturation.
Apply a 2 to 3 inch layer of drainage material across your prepared ground surface. This foundation layer allows excess water to flow away from plant roots while maintaining soil structure during heavy rainfall.
Incorporate larger gravel pieces in areas where you’ll place heavier potted plants. Enhanced drainage support prevents settling and maintains stable positioning for your most substantial containers.
Add Base Materials
Position your largest rocks first to establish focal points and provide structural support for the entire bed. These primary stones anchor your design and create the framework around which smaller elements will be arranged.
Arrange large boulders in natural clusters or circular patterns while leaving adequate space for plant growth. Strategic spacing allows your potted plants room to expand and creates visual breathing space throughout the composition.
Fill gaps between major rocks with sandy, gritty soil that promotes excellent drainage. This specialized soil mixture supports both the stability of your rock arrangement and the health of any plants you might transplant directly into the bed.
Compact the soil mixture lightly by walking on it or pressing it down with your hands. Gentle compression stabilizes your rock flower bed foundation without creating overly dense conditions that restrict water movement.
Arrange Your Rocks Strategically

Strategic rock placement forms the foundation of successful rock flower beds with potted plants. We’ll maximize both visual appeal and plant health by following these research backed arrangement techniques.
Place Larger Rocks First
Large rocks serve as primary focal points and anchor the entire design space effectively. We position these substantial stones first to establish the structural framework before adding smaller elements. Leaving ample room between large rocks ensures adequate space for potted plants and accommodates future growth without overcrowding.
Clustering large rocks too closely restricts healthy root development and limits air circulation around containers. We avoid this common mistake by maintaining generous spacing that allows plants to thrive. Strategic placement of these anchor stones also helps define natural pathways and viewing angles throughout the rock garden bed.
Fill Gaps with Medium-Sized Stones
Medium sized rocks provide essential structure between the large anchor stones we’ve already positioned. These transitional stones prevent soil erosion while creating a unified and natural appearance throughout the bed. We partially embed these stones in the soil to ensure long term stability and prevent shifting over time.
Proper gap filling with medium rocks establishes defined planting pockets for our potted arrangements. This technique creates natural boundaries that protect container plants from wind damage and soil displacement. We select medium stones that complement our larger rocks in both color and texture to maintain visual cohesion.
Create Natural-Looking Clusters
Rock clusters that mimic natural formations found in wild environments produce the most authentic and visually appealing results. We group rocks of varying sizes together while choosing stones with complementary colors and textures for design coherence. Avoiding too many dissimilar materials prevents a cluttered appearance that detracts from the overall aesthetic.
Natural clustering techniques involve positioning rocks at slight angles rather than perfectly upright orientations. This approach replicates how stones naturally settle in outdoor environments over time. We create asymmetrical groupings that feel organic while maintaining balance through strategic color and size distribution across the rock garden bed.

Position Your Potted Plants Effectively

Strategic placement transforms your rock flower bed from a simple arrangement into a cohesive industry design. We’ll explore how thoughtful positioning creates visual harmony between your potted plants and rocky foundation while ensuring long-term garden success.
Bury Pots Partially for Stability
Anchoring your containers prevents tipping and creates a more natural integration with the surrounding industry. We recommend burying pots about one-third to one-half their depth in soil or between rocks to achieve optimal stability. This technique protects root systems from extreme temperature fluctuations while maintaining proper moisture levels in rocky environments.
Securing your planters this way eliminates the artificial appearance of containers simply sitting on top of stones. The partially buried method creates seamless transitions between your potted plants and the rocky terrain. Plants appear settled into the industry naturally rather than looking temporarily placed.
Space Plants for Growth
Adequate spacing ensures each plant receives sufficient light, airflow, and nutrients without competing for resources. We calculate spacing based on mature plant size rather than current pot dimensions to prevent future overcrowding. Drought-resistant plants like succulents and perennials thrive in well-drained rocky soil when given proper room to develop.
Allow 12 to 18 inches between small containers and up to 24 inches for larger planters depending on the plant’s growth habits. This spacing accommodates spreading varieties while maintaining visual cohesion throughout your rock garden. Plants positioned too closely struggle to establish healthy root systems and may develop fungal issues from poor air circulation.
Create Height Variations
Incorporating containers of varying sizes adds vertical dimension and visual interest to your rock flower bed design. We position taller plants or elevated pots as focal points while using lower containers to cascade or fill spaces between rocks. Plants like Euphorbia Firesticks with their bright, fiery stems create stunning vertical accents against neutral stone backgrounds.
Layering different heights mimics natural growing patterns found in wild rocky landscapes. Cascading varieties such as Rock Soapwort work beautifully in lower positions where they can spill over stone edges. This varied approach creates depth and prevents your rock garden from appearing flat or monotonous while highlighting the unique characteristics of each plant variety.

Maintain Your Rock Flower Beds

Regular maintenance keeps your rock flower beds looking vibrant and ensures the health of your potted plants. We’ll focus on three essential tasks that preserve both the decorative stones and plant vitality.
Water Potted Plants Regularly
Establish a consistent watering schedule since rocks prevent direct water penetration to the soil in your containers. We recommend using drip irrigation or soaker hoses that deliver moisture directly to the root zone without saturating the surrounding stones. Slow watering techniques ensure the water reaches your potted plants effectively rather than running off the rock surfaces.
Apply water-soluble fertilizers near the root zone to supplement plant nutrients. Rock beds limit natural soil enrichment, making regular feeding essential for healthy growth. We suggest mixing fertilizer answers according to package directions and applying them during your regular watering routine.
Monitor soil moisture levels in each container since rocks can create microclimates with varying moisture retention. Check the soil by inserting your finger about two inches deep into each pot. Water when the top inch feels dry but before the soil becomes completely parched.
Prune and Replace Seasonal Plants
Remove dead or diseased foliage regularly to encourage healthy growth and prevent pest problems. We recommend inspecting your plants weekly and trimming damaged leaves, spent flowers, and overgrown branches with clean pruning shears. This practice maintains the aesthetic appeal while promoting new growth.
Replace seasonal plants as needed to maintain year-round visual interest in your rock flower bed. Switch out annuals at the end of their growing season and introduce new varieties that complement your rock colors and existing plant palette. We suggest planning these changes based on your local climate and the exact sunlight exposure in your rock bed area.
Adjust plant choices based on seasonal performance and changing garden conditions. Some plants may outgrow their designated spaces or struggle in certain rock bed microclimates. We recommend relocating struggling plants to more suitable areas and introducing better-adapted varieties.
Clean and Rearrange Rocks
Hose down rocks every few weeks to prevent surface grime and dust accumulation. We recommend using a garden hose with moderate water pressure to wash away debris without displacing smaller stones. This regular cleaning maintains the natural beauty of your rock materials and prevents buildup that can harbor pests.
Scrub stubborn stains with a brush using mild dish soap or white vinegar to avoid damaging the stone surfaces. Remove leaves, dirt, and organic debris using tools like a leaf blower, rake, or broom before they build up and cause staining or moss growth. We find that addressing these issues promptly prevents more intensive cleaning later.
Rearrange displaced stones during your cleaning routine to maintain a neat appearance and structural integrity. Replace any damaged rocks to keep the flower bed looking fresh and well-maintained. We suggest clearing fallen organic matter before it decomposes and creates an environment for unwanted weed growth or algae formation.

Enhance Your Design with Decorative Elements

We can elevate our rock flower beds beyond simple stone and plant combinations by incorporating thoughtful decorative elements. Strategic additions create visual depth while maintaining the natural beauty that makes these gardens so appealing.
Add Mulch Between Rocks
Mulch between rocks creates a polished foundation that serves multiple practical purposes in our rock flower beds. Organic mulch like bark or wood chips provides excellent contrast against stone textures while helping retain moisture for our potted plants. Temperature regulation becomes easier when mulch surrounds container roots, protecting them from extreme heat that rocks can generate during summer months.
Weed suppression happens naturally when we apply a 2-3 inch layer of quality mulch throughout our rock gardens. Different mulch materials offer unique aesthetic benefits: shredded hardwood creates rich, dark backgrounds that make colorful flowers pop, while pine bark maintains lighter tones that complement neutral stone colors. Regular mulch replacement every 12-18 months keeps our beds looking fresh and provides ongoing soil benefits for plants that may eventually transition from containers to direct planting.
Install Solar Lighting
Solar lighting transforms our rock flower beds into enchanting evening displays without complicated electrical work or increased energy costs. Small solar LED path lights position perfectly between rocks to illuminate walkways and highlight featured plant arrangements after dark. Spotlights work exceptionally well when we want to showcase exact specimens like architectural succulents or seasonal container displays.
Garden usability extends well into evening hours when we strategically place solar fixtures throughout our rock beds. Weather resistant solar lights require minimal maintenance while providing consistent illumination that enhances safety and ambiance. Color changing options allow us to create different moods for various occasions, while warm white LEDs maintain natural lighting that complements both stone and plant elements effectively.
Include Garden Ornaments
Garden ornaments bring personality and artistic flair to our rock flower beds while creating compelling focal points throughout the design. Rustic sculptures blend seamlessly with natural stone arrangements, while abstract pieces add contemporary elements that make our gardens feel like outdoor art galleries. Water features such as small fountains or decorative waterfalls introduce soothing sounds that enhance the tranquil atmosphere we’re creating.
Strategic ornament placement prevents our rock gardens from appearing too structured or monotonous. Natural materials like weathered wood, copper accents, or carved stone integrate beautifully with both rocks and potted plants without overwhelming the overall design. Seasonal ornament rotation keeps our displays fresh and interesting, allowing us to celebrate different times of year while maintaining the core structure that makes our rock flower beds so visually appealing.
Conclusion
We’ve shown you how rock flower beds with potted plants can transform any outdoor space into a stunning low-maintenance garden. This approach gives us the flexibility to adapt our designs seasonally while maintaining year-round visual appeal.
The combination of strategic rock placement proper plant selection and thoughtful decorative elements creates gardens that work for busy lifestyles. We can achieve professional-looking results without extensive gardening experience or important time investment.
Whether you’re dealing with challenging soil conditions or simply want more control over your garden’s appearance this method delivers impressive results. Start with quality rocks establish good drainage and choose plants that complement your climate for the best long-term success.
Frequently Asked Questions
What are rock flower beds with potted plants?
Rock flower beds with potted plants combine stone landscaping with container gardening. This approach involves arranging colorful potted plants among rocks to create beautiful garden displays that require minimal maintenance while maximizing visual impact. It’s perfect for busy homeowners who want attractive gardens without extensive upkeep.
What types of rocks work best for rock flower beds?
Natural stones like river rocks offer smooth surfaces and excellent drainage, while decomposed granite provides stability for heavy planters. Lava rock is ideal for its superior drainage properties. Use large boulders as focal points, medium rocks to fill gaps, and small pebbles for texture and moisture retention.
How do I prepare the ground for a rock flower bed?
Start by clearing grass, weeds, and debris from the area. Level the soil surface and remove large roots or obstacles. Install a drainage layer using coarse sand or gravel to prevent waterlogging. Position the largest rocks first to establish focal points, then fill gaps with sandy soil.
Which plants work best in rock flower beds?
Choose drought-tolerant varieties like succulents, ice plants, and rock soapwort that thrive in well-drained, rocky conditions. Layer plants by height using low-growing ground covers, medium-height succulents, and taller shrubs. Include evergreen plants for year-round structure and seasonal bloomers for color variety.
How should I arrange potted plants in the rock garden?
Partially bury pots for stability and a natural appearance while protecting root systems. Space plants adequately based on their mature size to prevent overcrowding. Use varying container heights to create vertical dimension and visual interest, mimicking natural landscape formations throughout your design.
What maintenance do rock flower beds require?
Establish consistent watering schedules using drip irrigation or soaker hoses. Apply water-soluble fertilizers regularly and prune plants as needed. Replace seasonal plants to maintain appeal and clean rocks periodically to prevent grime buildup. Rearrange elements seasonally to keep the display fresh and structurally sound.
How can I enhance my rock flower bed’s appearance?
Add mulch between rocks to retain moisture and suppress weeds while creating aesthetic contrast. Install solar lighting for nighttime illumination and safety. Incorporate garden ornaments like sculptures or decorative stones as focal points to add personality and artistic flair to your rock garden design.