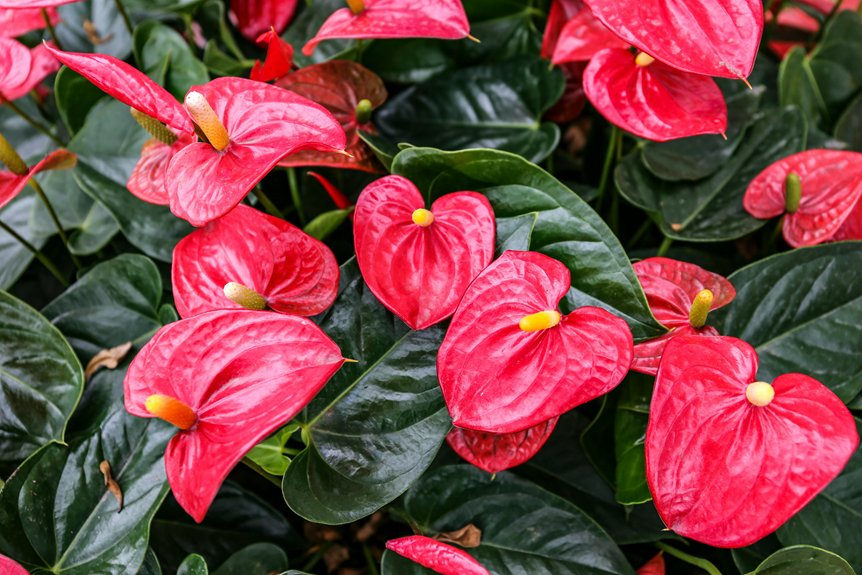
How Do You Care for an Anthurium Plant
To keep your anthurium healthy, you’ll need to focus on a few key areas. Give your plant medium to bright indirect light, and water it when the top two inches of soil feel dry to the touch. Your anthurium prefers high humidity—aim for around 80%—which you can achieve by misting it regularly or placing it on a pebble tray filled with water.
Temperature matters during the growing season from March through September. Keep your plant in a range between 70–90°F for best results. Use a breathable soil mix designed for orchids that contains peat moss, bark, and charcoal, since anthuriums don’t like sitting in wet soil.
Feed your plant once a month with diluted fertilizer during the growing season to support new growth. Every two to three years, check if roots are poking out of the drainage holes. When you see this, it’s time to repot your anthurium into a slightly larger container with fresh soil.
Winter is when your anthurium needs a break. For six weeks starting in October, reduce how much you water and lower the light levels slightly. This rest period actually triggers your plant to produce more flowers the following season. After those six weeks, you can return to your normal care routine and watch for new blooms to develop.
Light Requirements: Medium to Bright Indirect Exposure

How do you know when your anthurium’s getting the right amount of light? Look for vibrant leaves and consistent flowers on the spikes—that’s your signal that conditions are working.
Your anthurium does best in medium to bright indirect light, which mirrors the dappled sunlight filtering through forest canopies where it naturally grows. Position your plant near an east or west-facing window where it gets filtered rays throughout the day. A north-facing window works too if you want steady, gentle light. The key is keeping direct sun off the leaves, since it scorches and damages the delicate tissue.
Without enough light, your plant slows down and stops producing flowers, leaving you with weak, sparse growth. Finding that sweet spot between bright and filtered does take some trial and error, but once you dial it in, you’ll keep the plant producing steady flowers.
Watering Your Anthurium: Finding the Right Balance

Getting the light right sets the stage for good growth, but water management is what actually determines whether your anthurium does well or just gets by. Water when the top two inches of soil feel dry to the touch, and make sure your pot has drainage holes so moisture doesn’t get trapped. You can either water once a week or use six ice cubes—about half a cup—each time. Just know that you’ll need to adjust your routine when seasons change and humidity levels shift.
Overwatering is the biggest mistake people make with anthuriums. Too much water leads to root rot, which is hard to fix. On the flip side, underwatering causes the leaves to droop and slows down the plant’s growth. When the air is humid, mist the leaves every two or three days to help them along.
The key is paying attention to what your anthurium needs and adjusting as you go. Once you figure out the watering rhythm that works, you’ll start to notice when your plant is sending you signals about whether it’s getting enough water.
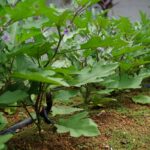
The Best Soil Mix for Anthuriums

You’ll want to create a breathable orchid-like mix using peat moss, shredded bark, perlite, charcoal, and sphagnum moss. These materials mimic the airy conditions anthuriums naturally experience in their tropical environments while preventing the waterlogging that causes root rot.
When it comes to repotting, resist the urge to upsize whenever you spot new growth. Instead, you should actually favor a slightly root-bound condition and repot only every two to three years or when growth noticeably slows. This mild constraint encourages healthier development and helps you avoid the soggy soil problems that often come with excessive pot space.
The soil itself needs to stay moist but never soggy. Let just the top two inches dry between waterings. You’ll achieve this balance by using a well-draining nursery pot with ample drainage holes, which gives you the practical foundation to maintain that precise moisture balance.
Breathable Mix Components
Why do so many anthurium owners struggle with root rot despite their best intentions? The answer lies in understanding breathable mix components, which form the foundation of successful anthurium care. You’ll want to combine specific materials that mimic the plant’s natural epiphytic habitat.
Start with peat moss and sphagnum moss as your moisture-retaining base. These materials hold water while still allowing air to move through the soil. Next, add shredded bark and perlite to create structural gaps that prevent the mixture from compacting over time. Finally, include charcoal, which absorbs excess moisture and helps prevent fungal problems.
This orchid-based mixture works better than heavy garden soil because it gives you the drainage your anthuriums need while keeping enough moisture between waterings. You should let the top two inches dry out before watering again. Adding drainage holes to your pot amplifies this effect, ensuring water moves through the soil instead of sitting at the roots where it causes rot. This setup supports your anthuriums’ growth patterns and keeps them healthy.
Preventing Water-Logging Issues
Waterlogged soil can do serious damage to your anthurium. When roots sit in soggy conditions, they suffocate and develop root rot that spreads quickly through the plant’s tissue. The good news is that preventing this problem comes down to a few concrete steps.
Set up a watering schedule that lets the top two inches of soil dry out between waterings. Rather than watering on a fixed calendar date, check the soil moisture yourself each time. Light levels and humidity change with the seasons, so what works in winter might not work in spring. Your pot matters too—make sure it has plenty of drainage holes and pair it with a breathable soil mix so excess water can escape reliably.
If you start seeing wilting leaves and smell something musty coming from the soil, you’ve let things go too far. When this happens, space out your waterings more. Give the soil extra time to dry between each watering session until the moisture level balances out again.
Root-Bound Soil Preference
Root-Bound Soil Preference
Anthuriums actually do better when their roots feel a bit cramped. This might seem odd at first, but when roots have limited space, the plant puts its energy into producing flowers instead of constantly trying to expand.
You’ll keep your anthurium in this root-bound state by repotting only every two to three years. Pick a container that holds the root ball snugly but still drains well. Your soil mix is important here: combine orchid bark, peat moss, perlite, charcoal, and sphagnum moss. This mixture stays airy enough to prevent waterlogging while keeping some moisture around the roots.
What you need to do:
- Keep the roots deliberately snug to push flower production
- Use a breathable orchid mix that drains thoroughly
- Water on a consistent schedule, adjusting for the season while keeping the soil slightly moist
This method works because you’re matching how anthuriums actually prefer to grow. You’ll get steady blooms without putting the plant through the stress of frequent repotting.
Temperature and Humidity Needs

Temperature and Humidity Needs
Getting temperature and humidity right matters more than you might think—these two factors work together and will determine whether your anthurium just gets by or actually flowers the way you want. Keep temperatures between 65–80°F for general health, though your plant flowers best when it’s between 70–90°F. Below 50–55°F, growth basically stops, so you’ll want to avoid that range.
Temperature and humidity work together to determine whether your anthurium merely survives or thrives and flowers beautifully.
Humidity is where things get demanding. You’re aiming for at least 80% for your anthurium to perform well and produce flowers. If your home tends to be dry, you have several options: run a humidifier, mist your plant regularly, group several plants together so they create their own humid microclimate, or set your pot on a pebble tray filled with water.
Cold drafts and temperature swings are stressors that will suppress flowering, so position your plant away from windows with drafty air or heating vents that fluctuate. During winter, keep conditions mild and stable while you water less frequently. This deliberate slowdown gives your plant a rest period and saves energy for next season’s flowers.
Repotting Anthuriums: When and Why

You’ll know it’s time to repot when you spot roots circling the soil surface or poking through drainage holes, or when the soil starts draining too quickly even after watering. A noticeable slowdown in growth is another sign, though aerial roots by themselves aren’t something to worry about—you can trim them if they’re in your way.
The growing season is your best timing for repotting. Your plant has more natural energy during this period, which means it’ll recover faster and produce stronger blooms afterward. The real key to success, though, is getting your soil mix right. You want something breathable that drains well, so aim for a combination of orchid bark, peat moss, perlite, charcoal, and sphagnum moss. This mix prevents water from sitting around your plant’s roots, which is what causes the stunted growth you’re trying to avoid.
Signs Your Plant Needs
When does an anthurium actually require repotting, and how can you tell if the time has genuinely arrived rather than rushing into unnecessary disruption? You’ll recognize the need through several reliable indicators.
Look for these specific signs:
Roots poking through drainage holes or circling around the soil surface tell you the root system has run out of space. You might also notice slowed growth or stressed-looking leaves, which suggest the soil has depleted its nutrients and can’t support your plant properly anymore. When roots completely fill the pot and water runs straight through without being absorbed, your anthurium is root-bound and needs more room.
What about aerial roots?
Don’t confuse aerial roots—those naturally occurring structures that help your plant stabilize itself—with a signal to repot. They’re just part of how your anthurium grows and don’t mean you need a bigger pot.
When to repot:
Plan to repot your anthurium every two to three years to keep it healthy and maintain its blooming capacity. Timing it right prevents both the stress of unnecessary repotting and the problems that come with waiting too long.
Optimal Repotting Timeline
Your anthurium doesn’t follow a strict calendar for repotting—it tells you when it needs a new pot through what’s actually happening inside. That said, a two-to-three-year schedule works as a solid baseline since it matches your plant’s natural growth patterns.
The best time to repot is between March and September when your anthurium is actively growing and putting energy into blooms and new leaves. Moving it during this window supports what it’s already doing rather than interrupting the process. Spring is particularly good because your plant can settle into fresh soil before summer’s heat and intensity kick in.
You’ll know repotting is necessary when you spot specific signs: roots poking out of drainage holes, roots circling around the soil surface, or a pot that suddenly feels much lighter than usual. These are your actual signals to act, not just calendar dates.
Best Potting Mix Practices
What makes the difference between an anthurium that does well and one that barely gets by often comes down to what surrounds its roots—the potting medium itself, which isn’t soil in the traditional sense but rather a carefully assembled blend designed to mimic the plant’s natural epiphytic habitat.
You’ll want to construct your potting mix using these components:
Orchid bark blend as your foundation ensures breathability and prevents water-logging. This serves as the base that everything else builds on.
Peat moss, shredded bark, perlite, and charcoal maintain aeration and drainage throughout the medium. These components work together to keep air pockets open so roots can access oxygen.
Sphagnum moss retains slight moisture while preserving the medium’s structure. This prevents the mix from compacting over time while keeping roots from drying out completely.
This combination keeps roots slightly moist without drowning them—a balance that makes a real difference after you’ve observed anthuriums for a while. The potting mix you choose directly determines whether your plant does well or merely persists. Getting the right blend means you’re not constantly fighting against poor drainage or watching roots rot from excess moisture.
Feed Your Anthurium Monthly During Growing Season

Your Anthurium needs consistent feeding during its active growth period from March through September. Use a balanced, water-soluble fertilizer at half-strength applied monthly. This approach works better than occasional heavy doses because it delivers steady nutrition without burning the roots.
Consistent monthly feeding with half-strength fertilizer during growing season prevents root burn and delivers steady nutrition.
The timing of when you apply fertilizer matters. Water your plant thoroughly first, then add the fertilizer. This two-step process prevents fertilizer burn and helps nutrients spread evenly through the soil rather than concentrating in one spot.
When winter arrives and your plant’s growth slows down naturally, you can reduce or stop feeding altogether. Your Anthurium doesn’t need as much nutrition when it’s not actively growing.
Keep an eye out for signs of overfertilizing. Leaf tips that look burned or crusty salt deposits on the soil surface mean you’ve given your plant too much. If you spot these issues, flush the soil with distilled water to remove the excess fertilizer and restore balance.
Troubleshooting Yellow Leaves, Brown Tips, and Wilting

Troubleshooting Yellow Leaves, Brown Tips, and Wilting****
Even with a solid feeding routine in place, you’ll eventually notice something’s gone wrong—yellowing leaves, crispy brown tips, or drooping stems that’ve lost their firmness. The good news is that these visible signs actually tell you exactly what’s happening beneath the soil surface.
Yellow leaves typically signal overwatering or poor drainage, causing root stress that shows up as discolored foliage. Brown tips indicate low humidity, underwatering, or salt accumulation from fertilizer buildup. Wilting stems from either insufficient water or root rot from overwatering. The key difference matters: you need to check your soil moisture and root health first before you respond, since the fixes for too much water and too little water are completely different.
Here’s what actually works. Use a breathable soil mix with orchid bark and perlite to prevent waterlogging. Regular misting maintains humidity levels without overdoing it. Cut your fertilizer to half-strength to reduce salt buildup that causes brown tips. These practices work together—adjusting one without the others won’t get you the results you’re after. Take time to inspect the roots and soil before making changes, and you’ll avoid making things worse while trying to fix them.
Managing Pests and Fungal Issues
How quickly an infestation can spiral when you’re not watching. One moment your anthurium is doing well, and the next you’re spotting fine webbing from spider mites or white cottony clusters of mealybugs tucked into leaf joints where they’re hard to reach. The difference between managing pests successfully and fighting them for months comes down to catching problems early.
Make weekly inspections part of your routine. Check new leaves and the undersides of older ones for tiny specks, webbing, or anything that looks off. These early warning signs tell you when you need to act.
| Pest | Signs | Treatment |
|---|---|---|
| Spider mites | Fine webbing, stippled leaves | Horticultural soap, neem oil |
| Mealybugs | White clusters, sticky residue | Neem oil applications |
| Fungus gnats | Tiny flying insects, soil moisture | Mosquito Bits, allow drying |
| Scale | Brown bumps on stems | Weekly inspection, removal |
| Thrips | Silvery streaks, distorted growth | Consistent monitoring |
Once you confirm you have pests, move your plant away from your other plants right away. Then check it again each week after you treat it. Keep treating until you’re sure the pests are gone before you put the plant back with your collection.
Winter Rest for Anthuriums: Encouraging Rebloom

After months of consistent care and feeding, you’ll notice your anthurium’s flowers slow down and the plant looks tired. That’s when the real work actually starts—but not the kind you might expect. Instead of doing more, you need to do less.
Your anthurium needs about six weeks of winter rest to build up energy for the next flowering cycle. During this time, you’re going to cut back on watering and light deliberately. This rest period lets your plant save resources for producing flower spikes next season.
Here’s what you should change during the rest period:
Adjust your watering. Give your anthurium less water, but don’t let the soil dry out completely. You’re looking for a balance—moist soil without waterlogged roots.
Reduce light exposure. Move your plant away from direct sunlight. It doesn’t need bright light during this phase.
Keep temperatures stable. Make sure your plant stays warmer than 55–60°F and away from cold drafts.
When the six weeks are finished, bring your anthurium back gradually. Slowly increase watering and fertilizing to normal levels. This gentle transition signals your plant that it’s time to grow and flower again. You’ll see new growth emerge as the plant responds to normal care conditions.