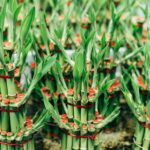
Spider plants are genuinely forgiving, which makes them a solid choice if you’re not confident in your plant care skills yet. They’ll handle inconsistent watering, changing light levels, and periods of neglect better than most houseplants you’ll encounter.
For basic care, water your spider plant roughly once a week after the top two inches of soil dry out. They do best in bright indirect light, but they’re flexible enough to adapt to dimmer corners if that’s what your space offers. Use well-draining soil to keep root rot from becoming a problem.
One practical advantage is that they’re completely safe around cats and dogs. During the growing season, you don’t need to fertilize much—just a light feeding now and then will keep them going. If you want to expand your collection, spider plants make it easy since they produce plantlets that you can separate and pot up with minimal effort.
The real benefit here is that their hardiness means you can actually succeed even when your care isn’t perfect. That said, learning what they specifically need will help them perform better than just getting by.
Why Spider Plants Are Nearly Impossible to Kill

If you’ve killed every houseplant you’ve brought home, a spider plant might finally break that cycle. These plants tolerate the conditions that typically doom other houseplants—inconsistent watering and variable light.
You can water roughly once weekly after checking that the top two inches of soil have dried. You don’t need to worry about precise timing or complicated schedules. Spider plants handle both bright indirect light and dimmer corners, though variegated varieties may lose their distinctive patterns in shadowy spots.
Even when things aren’t perfect, spider plants forgive the oversights. Brown leaf tips sometimes appear, and you can trim them away or manage them with occasional misting. The plant continues functioning regardless. Spider plants evolved to adapt to different conditions, which is why they’re so difficult to actually kill.
Light Requirements: Bright Indirect Light Is Best

Spider plants do best in bright indirect light—think near an east or north-facing window, a desk with good ambient brightness, or a hanging shelf where filtered sunlight reaches the leaves. You’ll want to keep them away from harsh direct sun, which can scorch the foliage and weaken the plant.
Your spider plant can handle lower light conditions pretty well. Just know that if you move a variegated variety to a dimmer spot, it’ll likely lose those distinctive stripes and turn solid green over time. That’s something to consider if the patterned look is what drew you to the plant in the first place.
Artificial light works in a pinch for windowless spaces, but it doesn’t give you the same full light spectrum that natural light provides. You might notice fewer of those baby plantlets and flowers that make spider plants fun to grow when they’re relying mainly on artificial light instead.
Avoiding Direct Sun Exposure
How you position your spider plant makes a real difference between keeping those patterned leaves looking good and dealing with scorched, browning ones. The key is understanding what your plant actually needs from sunlight. Spider plants do well in bright indirect light, but harsh afternoon sun coming through uncovered windows will burn the leaves and damage all that work you’ve put in.
Your best bet is positioning your plant near north or east-facing windows. The morning light there is gentle and won’t have that intense afternoon punch. If you’ve already got your plant in a south or west-facing spot, sheer curtains can help by softening the strongest rays before they reach the leaves. You could also try hanging shelves positioned away from direct sun exposure—this keeps your spider plant where you can see it while protecting those leaves from turning papery and discolored.
Ideal Window Placement Options
Where you position your spider plant matters more than you might think, since the right location keeps those distinctive variegated leaves looking good while the wrong spot gradually fades them out. Your window choice directly influences whether your plant does well or just barely makes it, so this decision is worth getting right from the start.
| Window Direction | Light Quality | Best For | Drawbacks | Recommendation |
|---|---|---|---|---|
| North-facing | Gentle, consistent | Variegated varieties | Limited brightness | Ideal choice |
| East-facing | Bright morning indirect | All spider plants | Minimal risk | Excellent option |
| South-facing | Intense, prolonged | Acclimated mature plants | Leaf scorch risk | Use sheer curtains |
| West-facing | Hot afternoon rays | Established specimens | Sunburn likely | Requires filtering |
| Artificial light | Controllable spectrum | Low-light spaces | Reduced flowering | Supplementary only |
Your best bet is positioning your spider plant near a north or east-facing window. Both give you bright indirect light without the risk of harsh sun exposure that can damage the leaves. East-facing windows are particularly forgiving since they provide good morning light without the intensity that comes later in the day. If you’re working with a south or west-facing window, you’ll need to filter the light with sheer curtains or move your plant back a bit from the glass to prevent leaf scorch. Artificial light works as a backup option if you don’t have good natural light available, though it won’t encourage as much flowering as window placement would.
Adaptability To Lower Light
Spider plants are genuinely forgiving when you’re dealing with less-than-ideal lighting situations. You can keep them in lower light environments, though you should expect their growth to slow down noticeably.
Here’s what happens: if your spider plant has variegated foliage (those striped leaves), you’ll see it gradually turn solid green in dim conditions. That color shift is basically your plant’s way of telling you it wants brighter light. It’s a useful signal rather than a sign something’s wrong.
Your best setup is medium to bright indirect light, but spider plants are flexible enough for trickier spots—like corners away from windows or areas that don’t get much natural sun. If natural light isn’t an option in a particular room, strong artificial light works reasonably well as a backup. This adaptability makes spider plants practical for filling in spaces throughout your home where other plants would struggle.
Watering Schedule: Every 10–21 Days

When you’re caring for your spider plant, you’ll find that getting the watering rhythm right matters more than sticking to a fixed schedule. The general rule is every 10 to 21 days, but your specific conditions will shift that timeline. The best way to know when to water is to stick your finger about two inches into the soil. Water only when that layer feels dry to the touch. This simple check prevents root rot, which can kill even tough plants.
| Condition | Watering Frequency |
|---|---|
| Bright indirect light | Every 10–14 days |
| Moderate light | Every 14–18 days |
| Lower light | Every 18–21 days |
| Summer months | Weekly |
| Winter months | Every 3–4 weeks |
Two practical details make a real difference. First, make sure your pot has drainage holes and use a saucer underneath to catch excess water. This prevents water from sitting around your roots. Second, try using distilled or rainwater instead of tap water. Tap water leaves behind mineral salts that cause browning on leaf tips. These small adjustments keep your spider plant in better condition over time.
Temperature and Humidity: The Range That Works

Spider plants do well indoors because they’re genuinely comfortable in the temperature range where you already live. They’ll be fine anywhere between 50 and 80 degrees Fahrenheit—basically your normal home temperatures. The key is keeping them away from temperature extremes: avoid placing them in direct midday heat, near frost-prone windows, or by air conditioning and heating vents, since these spots can damage their leaves.
For humidity, you don’t need to do much. Just mist your spider plant occasionally to prevent brown leaf tips, which happen when the air gets too dry or temperatures shift quickly. That’s really all it takes. Stick with stable conditions and a little periodic misting, and your spider plant will stick around for decades without needing any special climate setup on your part.
Soil and Drainage: Why Good Drainage Matters

Root rot is a real problem for spider plants, and it all comes down to drainage. Your soil needs to move water away from the roots quickly, which means mixing potting soil, coco coir, and pumice in balanced amounts. You also need pots with drainage holes—this isn’t optional.
When you set up your soil this way, air can actually reach the roots. This matters especially when you’re moving your plant from water propagation to soil, since you’ll need to pay attention to moisture levels during that shift. The goal is to avoid dense, compact soil that holds water like a sponge. Instead, you’re working with soil that lets roots access both water and oxygen.
Get the balance right, and your roots will grow without sitting in waterlogged conditions that cause them to rot and die.
Drainage Prevents Root Rot
How often have you noticed a spider plant’s leaves turning brown or yellow, only to discover the soil’s been sitting wet for days? That waterlogged condition suffocates roots by cutting off oxygen, which creates the perfect environment for root rot—a fungal infection that kills your plant from the ground up.
Good drainage prevents this by allowing excess water to escape so your roots stay healthy and can absorb nutrients efficiently. When you mix one-third potting soil, one-third coco coir, and one-third pumice, you’re actively protecting your spider plant against this common problem. The pumice particles create air pockets that prevent soil compaction, while the coir retains just enough moisture without becoming soggy. This soil approach transforms drainage from something you might overlook into your plant’s first line of defense.
Soil Mix Composition Matters
Getting your soil mix right makes a real difference for spider plants. You want to combine one-third potting soil, one-third coco coir, and one-third pumice. This blend creates the drainage you need to prevent waterlogging while letting roots spread out and get plenty of air.
The beauty of this mix is that it works with what spider plants actually need instead of against it. Dense, moisture-trapping soils lead to root rot, so you’re basically building a structure that drains well without sacrificing the support your plant needs to grow.
To boost fertility without messing up your drainage, stir in a couple handfuls of worm compost. This addition gives you nutrient-rich soil that still lets water move through easily. The combination means your spider plant gets both the food and the air circulation it prefers.
Moisture Balance And Aeration
Getting the watering rhythm right means checking when the top two inches of soil feel dry before you water again. This keeps spider plants balanced between getting enough moisture and having enough oxygen in the soil—the difference between roots that stay healthy and roots that rot. Consistent watering paired with strategic aeration prevents the soil from compacting, which suffocates roots over time.
Your soil mix matters just as much as your watering schedule. A well-draining combination of potting soil, coco coir, and pumice in equal thirds creates the porous structure roots need to breathe. You should also avoid letting water sit in saucers underneath your pots. Standing moisture is one of the quickest ways to trigger root rot, even when you’re doing everything else correctly.
Beyond soil and watering, periodic pruning helps maintain soil airiness and keeps that balance intact. If you can use distilled or rainwater instead of tap water, that’s worth doing—it prevents salt buildup that compounds drainage problems over time. These practices work together to give your spider plants the conditions they need to stay healthy.
Brown Tips and Yellow Leaves: What They Tell You

Why your spider plant’s leaves are changing color matters because these shifts tell you something specific about what’s going on in your plant’s environment. Brown tips usually mean your indoor air is too dry—a real problem in heated or air-conditioned homes. Yellow leaves point to different issues: you might be watering inconsistently, not giving the plant enough light, or it’s missing key nutrients.
When you spot these changes, it’s a signal that conditions have drifted from what your spider plant needs. Learning to read these visual cues takes practice, but it’s the skill that separates people who casually own plants from those who actually understand what their plants need.
To address brown tips and maintain appearance, prune off the affected leaves and mist your plant regularly. This combination restores how your spider plant looks while also boosting its overall health. As you get better at noticing and responding to these signals, you’ll develop real competence as a plant caretaker.
Fertilizing: When and How Often to Feed

Spider plants don’t need much fertilizer, but timing really matters. You’ll want to feed them during spring and summer when they’re actively growing. Once late fall and winter arrive, skip the fertilizer and let your plant rest naturally.
You have two main options: liquid fertilizer applied once a month during the warm seasons, or granular fertilizer used two to three times throughout the growing period. Either works fine, but here’s the key—switch between these types rather than mixing them together. Spider plants are sensitive to mineral buildup in the soil, and alternating formulations helps you avoid that problem.
There are a couple of situations where you should hold off on fertilizing entirely. Don’t apply anything when your soil is bone dry or waterlogged, since the plant can’t absorb nutrients properly in either condition. Also, stick to the recommended amounts on the package. Over-applying fertilizer won’t speed up growth and actually creates the exact problems you’re trying to prevent: stressed leaves and discoloration.
Seasonal Feeding Schedule
When it comes to feeding spider plants, less is genuinely more. Over-fertilizing is a common mistake that can damage the plant’s delicate root system and cause salt buildup in the soil, so you’ll want to be intentional about your approach.
Your seasonal feeding schedule should match the plant’s natural growth cycle. During spring and summer, you’ll apply liquid fertilizer once a month for two to three total applications across the growing season. When late fall and winter arrive, stop fertilizing altogether since your spider plant enters dormancy and won’t benefit from extra nutrients during this rest period.
One important rule: never feed a stressed spider plant, whether it’s bone dry or waterlogged. Adding fertilizer to a plant that’s already struggling will only make the problem worse. Wait until your plant is in stable condition before you resume your regular feeding routine. This straightforward approach keeps your spider plant care manageable and protective.
Fertilizer Types And Application
Fertilizer Types And Application
Choosing the right fertilizer formulation—whether liquid concentrate, granular pellets, or water-soluble powders—affects how well your spider plant absorbs nutrients and whether salt builds up in the soil. You’ll have options that work differently, and each has practical advantages depending on your schedule and preference.
During the growing season, alternating between fertilizer types helps you avoid nutrient imbalances. Apply liquid fertilizer at half-strength once a month in spring and summer for steady nourishment without overwhelming your plant. The key is avoiding mixing granular and liquid fertilizers at the same time, since this concentrates nutrients too heavily and can damage roots.
Watch for white crusty deposits on your soil surface, which signal salt buildup from overfeeding. When you spot these deposits, flush the soil thoroughly with water to remove excess salts. This simple maintenance step keeps your spider plant healthy and maintains its natural ability to produce plantlets.
Avoiding Over-Fertilization Mistakes
How often do spider plants actually need feeding, and what happens when you give them too much? Over-fertilization causes salt buildup in the soil—you’ll notice crusty white deposits on the surface or brown tips on leaves. To avoid this, feed your spider plant only two to three times during the warmer months using half-strength fertilizer.
When choosing how to fertilize, rotate between granular and liquid options rather than mixing them together. This approach gives you better control over how much nutrition your plant actually receives. If you already see salt residue building up, flush the soil thoroughly with water to remove the excess.
There are a couple of situations where you should skip fertilizing entirely. Don’t feed your spider plant if it’s bone dry or waterlogged, since stressed plants can’t process nutrients properly. You should also stop feeding during late fall and winter when the plant naturally grows more slowly.
This seasonal restraint might feel counterintuitive, but it actually supports better plantlet formation when growing conditions improve again.
Repotting: When and How to Size Up

Repotting: When and How to Size Up
Spider plants have an unusual preference—they actually like being a bit pot-bound. This means you won’t need to repot them as often as you might think. Only move your spider plant to a larger container when it shows signs of stress or clearly needs more space. If you have a smaller plant, go up one pot size. For a mature spider plant, jump up two sizes instead.
Timing matters for the transition to go smoothly. Repot during spring, summer, or early fall when your plant is actively growing and can recover faster from being moved. This is when it’ll adjust best to its new home.
The potting mix you choose makes a real difference in keeping your spider plant healthy. Mix equal parts potting soil, coco coir, and pumice—this combination gives you the drainage you need to prevent root rot. Stir in some worm compost as well. This adds nutrients that release slowly over time, so your plant gets fed without you having to do much extra work.
When you’re actually repotting, get the root ball out carefully. Press the sides of the pot or run a knife around the inside edge to loosen the roots. Spider plants develop tuberous roots that can stick, so this step helps them come out cleanly without damage.
Keep repotting infrequent and deliberate. You don’t need to disturb your spider plant often—doing it only when necessary keeps things simple and lets your plant focus its energy on growing rather than recovering from unnecessary moves.
Propagating Babies: Free Plants From Your Mother Plant

Spider plants are generous producers of new plants. Those long, arching stems you’ll notice growing from your mother plant are lined with plantlets—sometimes called spidettes—and each one can become a new plant.
Getting started with propagation is straightforward. Cut a spidette that has several leaves attached, then place it in damp compost or water. Roots typically develop within 7–14 days. Wait until your plantlets reach at least 2–3 inches in diameter and show visible root nodules before you separate and pot them individually. Since multiple plantlets grow on a single stem, you’re essentially multiplying your collection without buying new plants.
Regular pruning of these trailing stems manages your mother plant’s energy while encouraging healthier growth. This creates a sustainable cycle where you keep getting new plants while your original plant stays vigorous.
Is Your Spider Plant Safe for Pets?

If you’re a pet owner who’s worried about bringing plants into your home, spider plants can ease that concern. The ASPCA confirms that spider plants are non-toxic to both cats and dogs, so they’re a safe choice for households with curious pets. You can place them on shelves, in hanging baskets, or on tables without worrying that your cat or dog will get sick if they nibble on the leaves.
What makes spider plants especially practical for pet owners is that they don’t demand much attention. They tolerate low light, irregular watering, and general neglect better than most houseplants. This combination of safety and durability means you can focus on keeping your animals safe while still having living greenery in your space.
Your Spider Plant Checklist: Five Non-Negotiables
Your Spider Plant Checklist: Five Non-Negotiables
Spider plants are forgiving about missed waterings, but they do need consistent care to move beyond basic survival. Here are the five things you should prioritize.
Spider plants forgive missed waterings, but consistent care separates thriving plants from mere survival.
Watering: Let the topsoil dry out slightly between waterings. Once a week works for most situations, but dial it back during fall and winter when growth slows. You don’t need to be exact—just check the soil with your finger before Watering.
Light: Place your spider plant somewhere it gets moderate, indirect Light. This flexibility means you can set it up almost anywhere in your home without worrying too much about finding the perfect spot.
Soil: Use well-draining compost to avoid root rot. This is one of the main reasons spider plants struggle, so it’s worth getting right from the start.
Temperature: Keep your plant away from cold drafts and maintain moderate room temperatures. Sudden Temperature swings stress the plant more than you might expect.
Pest Checks: Look over your plant occasionally for pests. Spider plants rarely attract them, but catching problems early matters if something does show up.
Stick with these five basics consistently, and spider plant care becomes straightforward. You’ll get years of solid growth without much fuss.