Yellow leaves on your houseplants are telling you something specific is wrong. The key is figuring out what.
Overwatering is one of the most common culprits. When soil stays too wet, your plant’s roots can’t get oxygen and begin to rot. You’ll notice the soil feels mushy and smells off. On the flip side, underwatering prevents your plant from absorbing the nutrients it needs, which also shows up as yellowing.
Light matters more than you might think. Without enough light, your plant can’t produce enough chlorophyll, the pigment that keeps leaves green. Similarly, nutrient deficiencies—especially nitrogen or iron—cause yellowing, but in different ways. Nitrogen deficiency hits your older leaves first, while iron deficiency creates a yellowing pattern between the leaf veins on newer growth.
Root damage, pest infestations like spider mites, or pH levels that are too high or too low can all prevent nutrient absorption and cause the same symptom.
To pinpoint the problem, start with what you can see and feel. Check how wet or dry your soil is. Gently dig around the roots to see if they’re mushy or dark. Look at how much light that corner of your room actually gets. Pay attention to which leaves are yellowing and where—that pattern tells you whether it’s a nutrient issue or something else. Each clue points you toward a specific fix.
Diagnose Yellow Leaves: Match Symptoms to Root Causes

When you notice yellowing leaves on your houseplant, it’s easy to assume you’ve made a mistake—but that’s rarely the whole story. Yellow foliage usually points to one of several distinct problems, and each one needs a different fix.
Start by checking your watering habits. Overwatering and underwatering look almost identical at first, so test the soil with your finger before you water again. Stick your finger about an inch into the soil. If it feels soggy, you’re watering too much. If it’s bone-dry, you need to water more deeply and consistently.
Test your soil with your finger before watering again—soggy soil means overwatering, while bone-dry means you need deeper, more consistent watering.
Next, look at your drainage setup and root health. Even if you’re watering the right amount, compacted soil stops roots from absorbing nutrients properly. Make sure water drains quickly through the pot’s bottom holes, and consider repotting if the soil feels hard and dense.
Nutrient problems also cause yellowing, and each nutrient deficiency shows up differently. Nitrogen deficiency typically yellows the oldest leaves first, while iron deficiency creates yellow leaves with green veins still visible—a pattern called interveinal discoloration. Potassium and magnesium deficiencies each have their own telltale signs as well.
Finally, check your plant’s environment. The amount of light it gets and your home’s pH balance both affect how well your plant absorbs nutrients. Poor lighting can slow nutrient uptake, and soil that’s too acidic or alkaline locks nutrients out of reach even when they’re present in the soil.
Work through these factors one at a time, and you’ll pinpoint what’s actually going wrong rather than guessing.
Watering Problems: Too Much or Too Little Water

When you’re troubleshooting yellow leaves, watering problems rank near the top of the list. Whether you’re giving your plant too much water or not enough, each situation damages your plant differently.
Overwatering is a common mistake. When soil stays constantly wet, it cuts off oxygen to the roots. Without oxygen, your roots can’t deliver water and nutrients up to your leaves, even though moisture is right there in the soil. Underwatering creates the opposite issue—your roots simply can’t pull the nutrients they need from dry soil.
To figure out which problem you’re facing, test your soil before watering again. Push your finger about an inch into the potting mix. If it still feels damp, wait a few more days. If it’s dry at that depth, water deeply until moisture reaches throughout the entire root zone. This simple check takes the guesswork out of watering and helps you avoid both extremes.
Overwatering and Root Suffocation
Overwatering and Root Suffocation****
You probably water your plants thinking you’re being helpful, but overwatering is one of the easiest ways to accidentally kill them. When you keep soil constantly wet, you’re actually suffocating the roots. Roots need oxygen just like you do, and saturated soil blocks them from getting it. Without oxygen, roots start to rot. Once root rot sets in, your plant can’t absorb water or nutrients anymore, even though the soil is soaking wet. You’ll see yellowing leaves as the plant’s system breaks down and can’t move what it needs upward through the stems.
The fix starts with paying attention to your soil. Before you water, stick your finger a couple inches into the soil. It should feel dry at that depth. Only water when it genuinely needs it, and when you do, water deeply so it reaches the whole root system. If you’re using containers, make sure they have drainage holes in the bottomagethis is non-negotiable. Water needs somewhere to escape. Use a quality potting mix that’s formulated to hold some moisture without staying waterlogged. These basics create the conditions your roots actually need to function.
Underwatering and Nutrient Deficiency
If overwatering suffocates roots by drowning them, underwatering starves them by cutting off the moisture they need to transport nutrients throughout the plant. Here’s where it gets tricky: yellowing leaves from too little water look almost identical to yellowing from too much water. When you don’t water deeply enough, your plant can’t absorb the nutrients it needs, even when those nutrients are sitting right there in the soil.
To figure out whether you’re dealing with underwatering or a nutrient deficiency, start by testing your soil moisture regularly before you water. Water deeply until you see excess draining from the bottom holes—this matters because shallow watering leaves the lower roots dry. Choose a potting mix that holds moisture appropriately instead of drying out too fast, and make sure your pot size matches your plant so water doesn’t evaporate instantly. If yellowing continues even after you’ve fixed your watering routine, check your nitrogen levels since that’s often the culprit when everything else checks out.
The reason this distinction matters is that the solutions are completely different. Treating an underwatering problem as a nutrient issue wastes your time and money, so getting it right the first time saves you frustration down the road.
Testing Soil Moisture Levels
How you’ll determine whether your plant’s yellowing stems from too much or too little water comes down to one straightforward practice: checking your soil’s moisture before you water. This habit eliminates the guesswork and shifts you from reacting to problems into preventing them.
Insert your finger into the soil to a depth of about one to two inches. This simple gesture reveals whether watering is truly needed. You’re feeling for dryness—that telltale texture indicating your plant’s roots require hydration.
This tactile assessment protects root health by preventing both overwatering’s oxygen-depleted conditions and underwatering’s nutrient delivery failures. Once you’ve mastered this fundamental skill, adjusting your watering schedule seasonally becomes intuitive, and yellow leaves become increasingly rare.
Light Deficiency: Why Poor Lighting Causes Yellowing
When you’ve moved a plant to a shadier corner and noticed its leaves gradually turning pale and yellow, you’ve likely run into one of the most common causes of leaf discoloration—not enough light.
Low light gets in the way of photosynthesis, which is the process your plant uses to make chlorophyll and energy. When your plant doesn’t get enough brightness, it can’t produce the nutrients it needs. This leads to slower growth and yellowing leaves that gradually spread across the plant.
What to look for with light deficiency:
- New leaves coming in pale and weak instead of vibrant
- Yellowing that affects both older and newer leaves across the plant
- Slower overall growth with fewer leaves filling in
- General weakening because the plant can’t generate enough energy
The key is figuring out what your specific plant needs. Some plants naturally prefer shade while others are sun-dependent. Once you know your plant’s natural habitat, you can adjust the light it gets. Moving it to a brighter spot or positioning it closer to a window will help it photosynthesize more effectively and recover its color.
Root Damage and Rot: Signs and Solutions
When you notice yellow leaves despite adequate light, it’s time to check your plant’s roots. Remove the pot and look closely at what’s underneath. Healthy roots are whitish-yellow, while unhealthy ones look mushy and smell bad. This matters because damaged roots can’t deliver nutrients to your leaves.
You’ll likely find one of two problems. If the soil is compacted, you can fix it by pruning away the damaged root sections and repotting into fresh soil with better drainage and more room to expand. If the roots are truly rotten, though, you’ll need to replace the entire plant rather than trying to salvage it.
Root problems usually come from two sources: environmental damage like compacted soil that blocks water and oxygen movement, or disease and physical damage. Once you understand which issue you’re facing, you can take the right steps to stop your plant’s decline instead of just watching it get worse.
Identifying Rotten Root Signs
Why your plant’s roots matter more than you might think: they’re the underground network responsible for absorbing water and nutrients and transporting them upward to feed your leaves. When roots deteriorate through physical damage, fungal infection, or bacterial decay, that entire system breaks down, leaving your foliage starved and yellowing despite your best watering efforts.
When diagnosing root rot, gently remove your plant from its pot and examine the roots closely. Look for several key signs of decay:
- Dark, slimy roots indicating advanced rot
- A foul odor coming from the soil or root zone
- Soft, mushy texture when you gently press the roots
- Brown or black coloring instead of the whitish-yellow of healthy roots
- Compacted root systems that restrict how nutrients move through the plant
Healthy roots feel firm and smell earthy. Once you’ve examined them, you’ll know whether you’re dealing with root rot that requires fresh soil and a new pot, or simply roots that are compacted and just need pruning and repotting with fresh growing mix.
Repotting For Root Recovery
Once you’ve confirmed that your plant’s roots are either rotted or severely compacted, you need to act fairly quickly. Repotting is the most direct way to help your plant recover.
Start by gently removing your plant from its current pot. Look at the roots carefully and prune away any that are darkened or mushy—these signal root rot. Keep the healthy whitish-yellow roots intact, as they’ll support new growth.
Grab fresh potting mix and find a larger container that has adequate drainage holes. These holes are important because they prevent water from sitting in the soil and causing disease down the line. Position your plant at the same depth it was before, then loosen the soil around it to give new roots room to grow.
After repotting, water your plant thoroughly. From there, let the top inch of soil dry out between waterings. This measured approach—avoiding both underwatering and overwatering—gives your plant’s roots the best chance to recover and establish themselves in the new container.
Nutrient Deficiencies and Soil pH Issues
How you’ll know the difference between a pH problem and a genuine nutrient deficiency often comes down to careful observation. When your soil maintains correct pH balance yet leaves still turn yellow, you’re likely facing a true nutrient shortage rather than a pH-related issue.
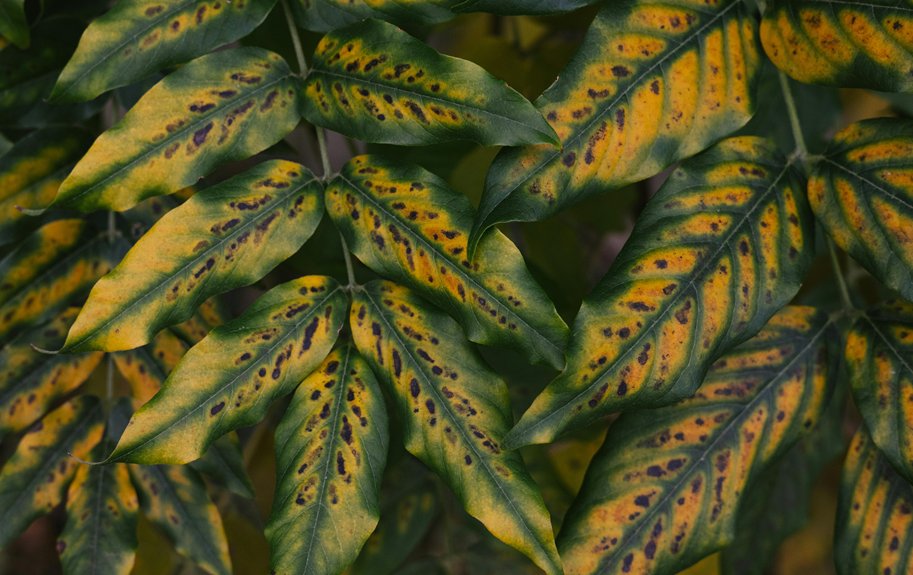
Understanding specific deficiency patterns helps you respond accurately. Each nutrient shows up differently on your plants. Nitrogen deficiency causes general yellowing across older leaves first. Iron deficiency creates yellowing between leaf veins on new growth at plant tips. Magnesium deficiency shows yellow patches between veins while the veins themselves stay distinctly green. Potassium deficiency turns leaf edges bright yellow while the inner tissue stays green.
Matching symptoms to specific nutrients rather than assuming one culprit saves you time and resources while actually fixing the problem. Testing your soil pH first matters because pH balance directly affects whether your plants can access the nutrients already present in the soil. Sometimes what looks like a deficiency is really just a availability issue.
Pests, Disease, and Recovery Steps

Beyond nutrient problems and pH imbalances, pests and diseases are another reason your leaves turn yellow. These two issues often show up together and can really drain your plant’s strength and chlorophyll production. Aphids, spider mites, mealybugs, and whiteflies are common culprits—they feed directly on leaf sap and leave behind visible clues like fine webbing, sticky residue, or white clusters on the undersides of leaves. Fungal diseases work differently, creating dark spots with yellow borders or pale patches, especially when cold water hits the leaves.
Here’s what you need to do to turn things around. Check your plants regularly so you catch problems early instead of waiting until they get out of hand. Once you spot an issue, apply targeted treatments like neem oil or spinosad to address the specific pest or disease you’re dealing with. Avoid using cold water when you spray, since that actually makes fungal problems worse.
Keep in mind that repeated infestations create ongoing yellowing that weakens your entire plant. This is why integrated pest management—using multiple prevention and treatment methods together—is so important. Your best defense is consistent attention and catching problems before they spiral.